创建定时任务的 5 种方式,还有谁不会!!
Written on: June 20, 2021
Title : 创建定时任务的 5 种方式,还有谁不会!!
link : 创建定时任务的 5 种方式,还有谁不会!!
创建定时任务的 5 种方式,还有谁不会!!
Quartz表达式生成地址 的 @Scheduled
一、定时任务的五种创建方式
1、使用线程创建 job 定时任务
/** * TODO 使用线程创建 job 定时任务 * @author 王松 */public class JobThread { public static class Demo01 { static long count = 0; public static void main(String[] args) { Runnable runnable = new Runnable() { @Override public void run() { while (true) { try { Thread.sleep(1000); count++; System.out.println(count); } catch (Exception e) { // TODO: handle exception } } } }; Thread thread = new Thread(runnable); thread.start(); } }}2、使用 TimerTask 创建job定时任务
/** * TODO 使用 TimerTask 创建job定时任务 * @author 王松 */public class JobTimerTask { static long count = 0; public static void main(String[] args) { TimerTask timerTask = new TimerTask() { @Override public void run() { count++; System.out.println(count); } }; //创建timer对象设置间隔时间 Timer timer = new Timer(); // 间隔天数 long delay = 0; // 间隔毫秒数 long period = 1000; timer.scheduleAtFixedRate(timerTask, delay, period); }}3、使用线程池创建 job定时任务
/** * TODO 使用线程池创建 job定时任务 * @author 王松 */public class JobScheduledExecutorService { public static void main(String[] args) { Runnable runnable = new Runnable() { @Override public void run() { // task to run goes here System.out.println("Hello !!"); } }; ScheduledExecutorService service = Executors.newSingleThreadScheduledExecutor(); // 第二个参数为首次执行的延时时间,第三个参数为定时执行的间隔时间 service.scheduleAtFixedRate(runnable, 1, 1, TimeUnit.SECONDS); }}4、Quartz** 框架**
1、引入maven依赖
<dependencies> <!-- quartz --> <dependency> <groupId>org.quartz-scheduler</groupId> <artifactId>quartz</artifactId> <version>2.2.1</version> </dependency> <dependency> <groupId>org.quartz-scheduler</groupId> <artifactId>quartz-jobs</artifactId> <version>2.2.1</version> </dependency></dependencies>2、任务调度类
public class MyJob implements Job { @Override public void execute(JobExecutionContext context) throws JobExecutionException { System.out.println("quartz MyJob date:" + System.currentTimeMillis()); }}3、启动类
public class JobQuartz { public static void main(String[] args) throws SchedulerException { //1.创建Scheduler的工厂 SchedulerFactory sf = new StdSchedulerFactory(); //2.从工厂中获取调度器实例 Scheduler scheduler = sf.getScheduler(); //3.创建JobDetail, JobDetail jb = JobBuilder.newJob(MyJob.class) //job的描述 .withDescription("this is a ram job") //job 的name和group .withIdentity("ramJob", "ramGroup") .build(); //任务运行的时间,SimpleSchedle类型触发器有效,3秒后启动任务 long time= System.currentTimeMillis() + 3*1000L; Date statTime = new Date(time); //4.创建Trigger //使用SimpleScheduleBuilder或者CronScheduleBuilder Trigger t = TriggerBuilder.newTrigger() .withDescription("") .withIdentity("ramTrigger", "ramTriggerGroup") //.withSchedule(SimpleScheduleBuilder.simpleSchedule()) //默认当前时间启动 .startAt(statTime) //两秒执行一次,Quartz表达式,支持各种牛逼表达式 .withSchedule(CronScheduleBuilder.cronSchedule("0/2 * * * * ?")) .build(); //5.注册任务和定时器 scheduler.scheduleJob(jb, t); //6.启动 调度器 scheduler.start(); }5、springboot 的 @Scheduled 注解
@Component@Configuration //1.主要用于标记配置类,兼备Component的效果。@EnableScheduling // 2.开启定时任务public class SaticScheduleTask { @Scheduled(cron = "0/5 * * * * ?") //3.添加定时任务 //@Scheduled(fixedRate=5000) //或直接指定时间间隔,例如:5秒 private void configureTasks() { System.err.println("执行静态定时任务时间: " + LocalDateTime.now()); }}二、xxl-job 任务调度后台 Admin
xxl-job 有什么用?
- 分布式集群的情况下,保证定时任务不被重复执行。
- 执行原理同Nginx 类型,所有定时任务通过任务调度平台分发,也可配置负载均衡等等
- 首先让我们能够使用起来,搭建一个自己的任务
Spring Boot 基础教程就不介绍了,推荐看这里:https://github.com/javastacks/spring-boot-best-practice
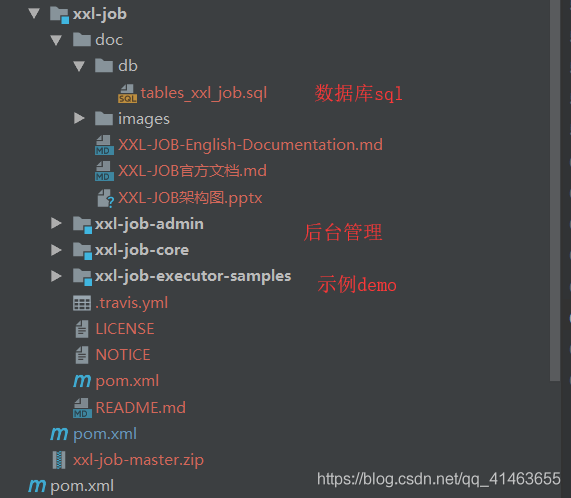
第一步: github下载源码导入
下载地址:https://github.com/xuxueli/xxl-job/
当前版本目录结构 2.1.1
第二步: 执行sql
文件地址:xxl-job/doc/db/tables_xxl_job.sql
当前2.1.1版本sql

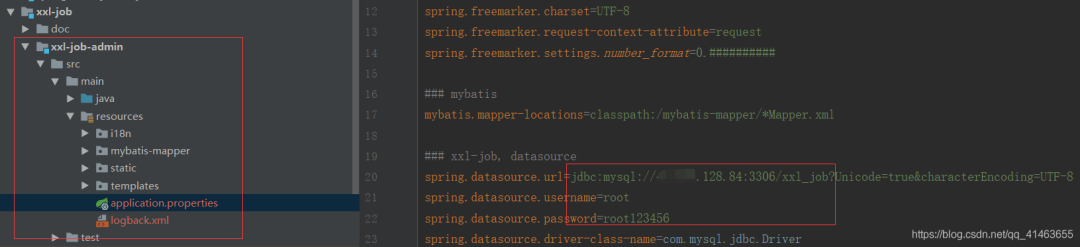
第三步: 修改xxl-job-admin项目配置
配置文件:application.properties
修改数据库连接
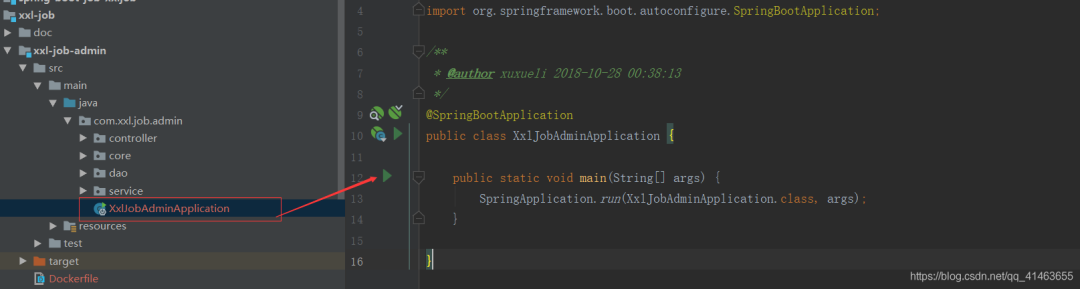
第四步: 启动admin项目
springboot 方式启动项目
访问 / 123456
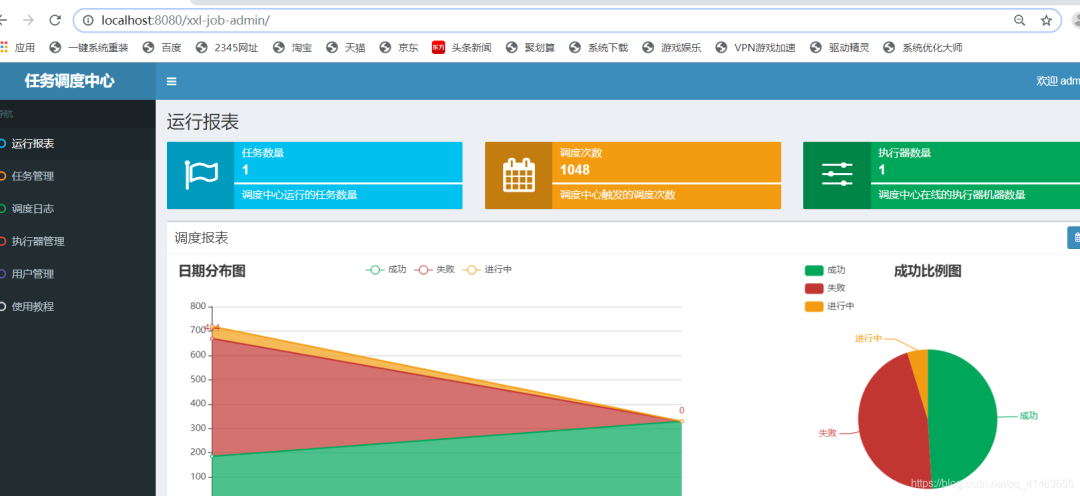
任务调度中心就搭建好了
接下来需要创建一个服务器连接任务调度中心
三、自创建boot项目的任务xxl-job
创建一个 boot 项目
我的目录结构
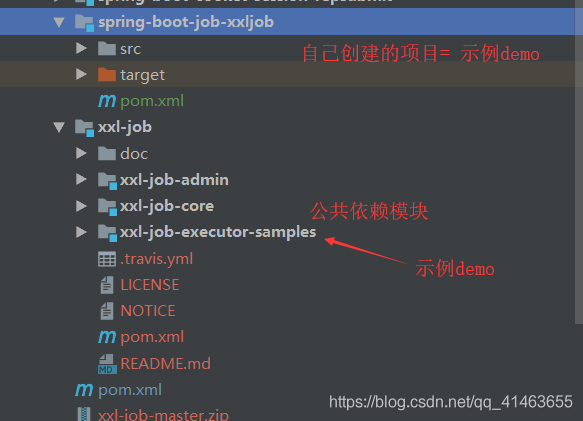
pom.
web核心及 xxl-job-core
<!-- spring-boot-starter-web (spring-webmvc + tomcat) --><dependency> <groupId>org.springframework.boot</groupId> <artifactId>spring-boot-starter-web</artifactId></dependency><dependency> <groupId>org.springframework.boot</groupId> <artifactId>spring-boot-starter-test</artifactId> <scope>test</scope></dependency><!-- xxl-job-core 版本号根据自己下载的版本修改 --><dependency> <groupId>com.xuxueli</groupId> <artifactId>xxl-job-core</artifactId> <version>2.1.1-SNAPSHOT</version></dependency>logback.
日志配置直接拷贝
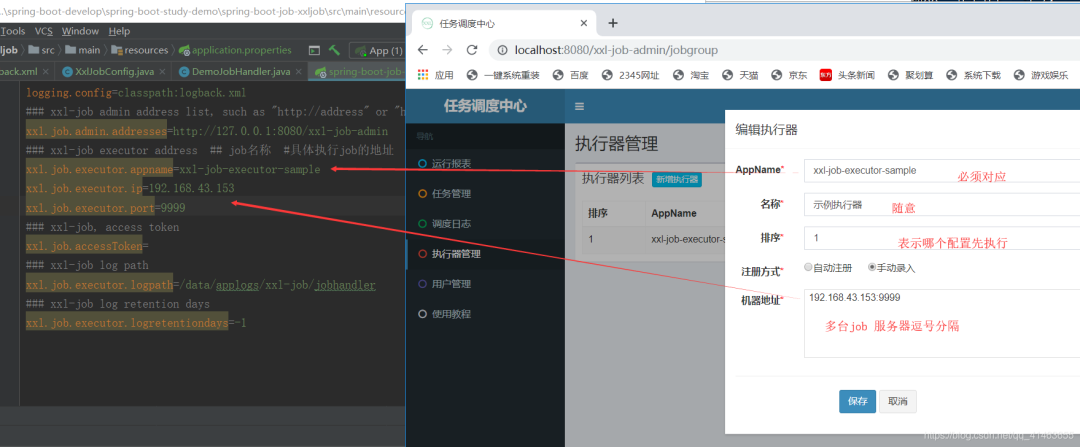
<?application.properties 加入配置
需修改或自定义
- xxl-job admin 地址
- xxl.job.executor.appname 自定义名称,后台配置必须对应
- xxl.job.executor.ip 当前电脑Ip,或部署项目的电脑Ip
- xxl.job.executor.port 端口
# 端口号server.port=8081# 日志logging.config=classpath:logback.添加boot配置类 XxlJobConfig
/** * xxl-job xxljob.config */@SuppressWarnings("ALL")@Configurationpublic class XxlJobConfig { private Logger logger = LoggerFactory.getLogger(XxlJobConfig.class); @Value("${xxl.job.admin.addresses}") private String adminAddresses; @Value("${xxl.job.executor.appname}") private String appName; @Value("${xxl.job.executor.ip}") private String ip; @Value("${xxl.job.executor.port}") private int port; @Value("${xxl.job.accessToken}") private String accessToken; @Value("${xxl.job.executor.logpath}") private String logPath; @Value("${xxl.job.executor.logretentiondays}") private int logRetentionDays; @Bean(initMethod = "start", destroyMethod = "destroy") public XxlJobSpringExecutor xxlJobExecutor() { logger.info(">>>>>>>>>>> xxl-job xxljob.config init."); XxlJobSpringExecutor xxlJobSpringExecutor = new XxlJobSpringExecutor(); xxlJobSpringExecutor.setAdminAddresses(adminAddresses); xxlJobSpringExecutor.setAppName(appName); xxlJobSpringExecutor.setIp(ip); xxlJobSpringExecutor.setPort(port); xxlJobSpringExecutor.setAccessToken(accessToken); xxlJobSpringExecutor.setLogPath(logPath); xxlJobSpringExecutor.setLogRetentionDays(logRetentionDays); System.err.println(ip+":"+port); return xxlJobSpringExecutor; } /** * 针对多网卡、容器内部署等情况,可借助 "spring-cloud-commons" 提供的 "InetUtils" 组件灵活定制注册IP; * * 1、引入依赖: * <dependency> * <groupId>org.springframework.cloud</groupId> * <artifactId>spring-cloud-commons</artifactId> * <version>${version}</version> * </dependency> * * 2、配置文件,或者容器启动变量 * spring.cloud.inetutils.preferred-networks: 'xxx.xxx.xxx.' * * 3、获取IP * String ip_ = inetUtils.findFirstNonLoopbackHostInfo().getIpAddress(); */}任务job
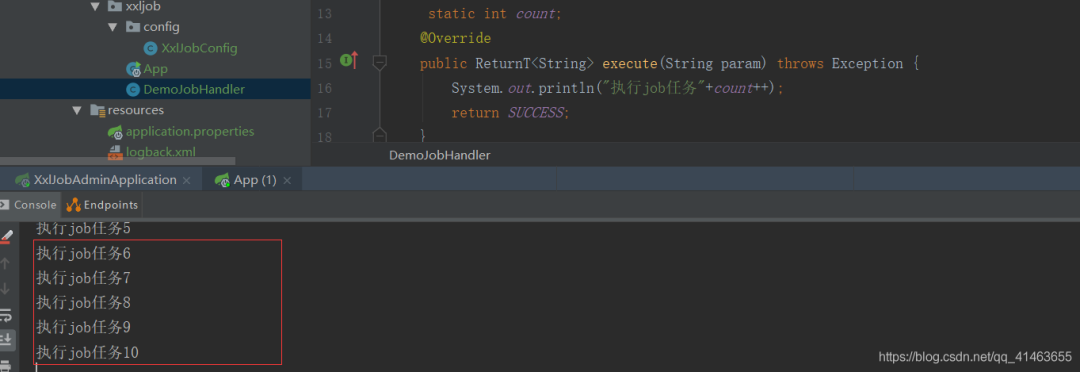
@JobHandler(value="demoJobHandler")@Componentpublic class DemoJobHandler extends IJobHandler { static int count; @Override public ReturnT<String> execute(String param) throws Exception { System.out.println("执行job任务"+count++); return SUCCESS; }}admin 后台配置
执行管理器下
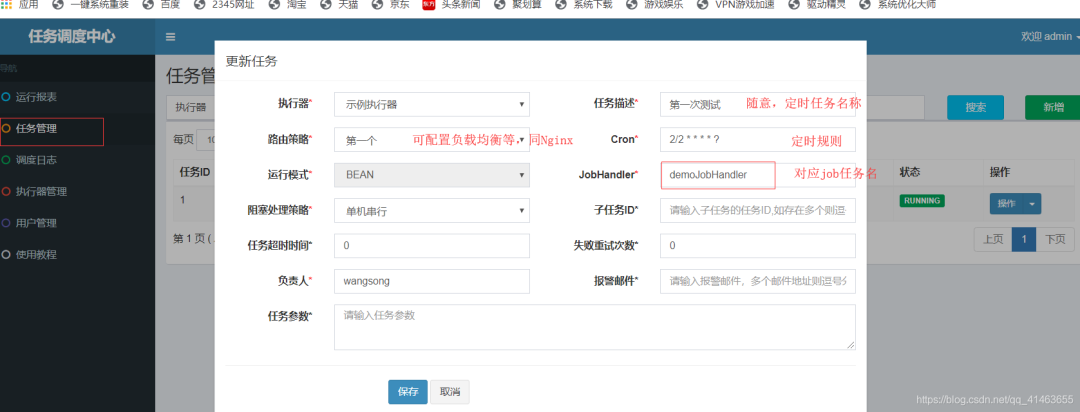
任务管理下编辑任务
定时规则生成 >> 如:@JobHandler(value="demoJobHandler")
启动
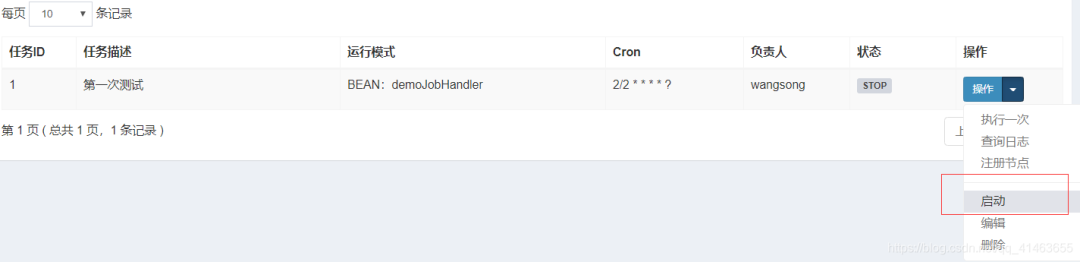
这样就配置完成了
原文链接:https://blog.csdn.net/qq_41463655/article/details/100839629
版权声明:本文为CSDN博主「兮家小二」的原创文章,遵循CC 4.0 BY-SA版权协议,转载请附上原文出处链接及本声明。
近期热文推荐:
1.1,000+ 道 Java面试题及答案整理(2021最新版)
2.终于靠开源项目弄到 IntelliJ IDEA 激活码了,真香!
3.阿里 Mock 工具正式开源,干掉市面上所有 Mock 工具!
4.Spring Cloud 2020.0.0 正式发布,全新颠覆性版本!
5.《Java开发手册(嵩山版)》最新发布,速速下载!
觉得不错,别忘了随手点赞+转发哦!
原文转载:http://www.shaoqun.com/a/817665.html
忘记穿内裤被同桌摸了一天 一群女同学把我玩硬了:http://www.30bags.com/m/a/249730.html
姐夫垂涎小姨子美色 趁其喂奶不备之时兽性大发实施强奸:http://lady.shaoqun.com/a/77085.html
naning9韩国官网:https://www.ikjzd.com/w/2401
玉米地里的大嫂让我收不住欲望(4/4):http://www.30bags.com/m/a/249639.html
Quartz表达式生成地址的@ScheduledQuartz框架一、定时任务的五种创建方式1、使用线程创建job定时任务/***TODO使用线程创建job定时任务*@author王松*/publicclassJobThread{publicstaticclassDemo01{staticlongcount=0;publicstaticvoidmain(String[]args){Runnabler
杨帆:https://www.ikjzd.com/w/1648
认真你就输了 求欢被拒后8招让你不尴尬:http://lady.shaoqun.com/m/a/19345.html
自述陪读发生了性关系 小东西早想在这办了你了:http://lady.shaoqun.com/m/a/256967.html
女班主任在我胯间喘息 掀开超短裙老师裙子挺进去:http://www.30bags.com/m/a/249765.html
大理剑湖迎来最佳观鸟季:http://www.30bags.com/a/222906.html
rfq:https://www.ikjzd.com/w/251
二类电商:https://www.ikjzd.com/w/1457
奇葩证明凸显中国签证壁垒 说走就走仍然困难:http://www.30bags.com/a/417591.html
宝贝你的小兔子真软 让我尝尝你的这里是不是好甜:http://lady.shaoqun.com/a/248373.html
深圳2021日本平面设计展什么时候举办:http://www.30bags.com/a/445888.html
Lazada新手如何设置使用Chat?:https://www.ikjzd.com/articles/145860
facebook的广告营销怎么做?:https://www.ikjzd.com/articles/145855
That's the article 创建定时任务的 5 种方式,还有谁不会!!
You are now reading the article 创建定时任务的 5 种方式,还有谁不会!! with link address https://zonetechno-update.blogspot.com/2021/06/5_20.html


